
![]()
Please read these directions all the way through before you jump in to the pattern and the cutting. This is considered to be a challenging pattern that takes an experienced sewer a few hours to complete.
For a print friendly version with the patterns click Bears for Israel Instructions
MATERIALS NEEDED
* If you are a 1sttime bear maker we recommend using one fabric to ensure your success. If you are a seasoned bear maker or want a challenge try two fabrics.
CUTTING YOUR FABRIC
| For a one-fabric arrangement | For a two-fabric arrangement |
| The pattern pieces below distinguish | Please follow the piece numbers below |
| how many pieces of each pattern shape | ♦ Fabric 1 (main fabric) = # |
| you will need | ♦ Fabric 2 (accent fabric) = $ |
| Head | Body | Arms |
| E (side back head): cut 2 # | F (front body): cut 2 # | H (top arm): cut 2 # |
| C (side front head): cut 2 # | G (back body): cut 2 # | I (bottom arm): cut 2 $ |
| D (center back head): cut 1 $ | ||
| B (center front head): cut 1 $ | ||
| Ears | Feet | Legs |
| A (ear): cut 4 $ | k (bottom foot): cut 2$ | J (leg): cut 2# |
ASSEMBLING YOUR BEAR
BEAR SEWING DIRECTIONS
Step 1: Body Fronts
| Join body fronts, matching notches | 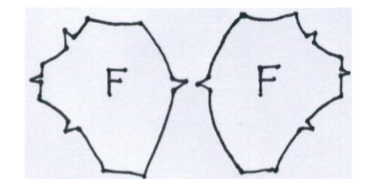 |
Step 2: Body Backs
| Join body backs. Reinforce stitch approximately
1/8 between dots on each back piece. Join the remainder of the back seam. The opening in the back is to allow for stuffing later. |
 |
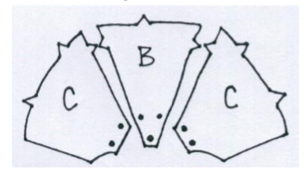
Step 3: Front of Head
| Join front side head pieces to front center head piece,
matching notches. Match the dots to form the nose (please refer to the bear photo to see a finished nose |
 |
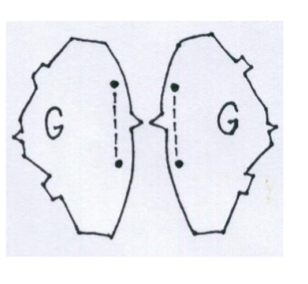
Step 4: Back of Head
| Join back side head pieces to back center head piece
matching notches |
 |
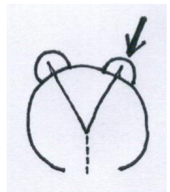
Step 5: Ears
| For one ear, place two pieces with right sides together.
Stitch and turn right side out. Bring notches together to form a pleat and baste. Repeat for second ear. |
 |
Step 6: Attach Ears to Head
| Stuff a little fiberfill in each ear. Then match the
notch on the pleated ear to the seam lines that join the front center head to the front side head. Baste the ear to the front of the head with right sides together. Repeat with the other ear. Then, with the ears tucked inside, sew the back of the head to the front of the head, matching notches. Turn and press. |
 |
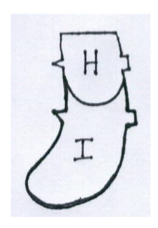
Step 7: Arms
| With right side of top arm piece and bottom arm
piece together, sew together, matching the notches. Turn and press. Repeat for second arm. |
 |
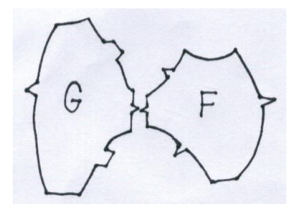
Step 8: Body
| Attach front body to back body at short side seam,
matching notches. Turn and press. |
 |
Step 9: Attach Arms to Body
| Set arms in body, matching dots to side seams
and matching notches. Be sure arms bend forward. |
 |
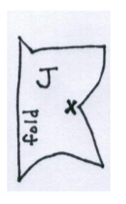
Step 10: Legs
| Fold the leg piece so that right sides are together.
Sew the seams. Reinforce the seams at the X mark.Clip the seams at the X. Turn right side out and press. Repeat for second leg. |
 |
Step 11: Feet
| Set in the bottom foot piece in the leg, matching
the notches. Repeat for second leg and bottom foot piece. |
|
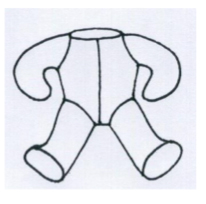
Step 12: Finishing
| Turn all body parts inside out so right sides are facing each other. Attach head to body, matching
chin seam to front seam. Attach legs to the body. |
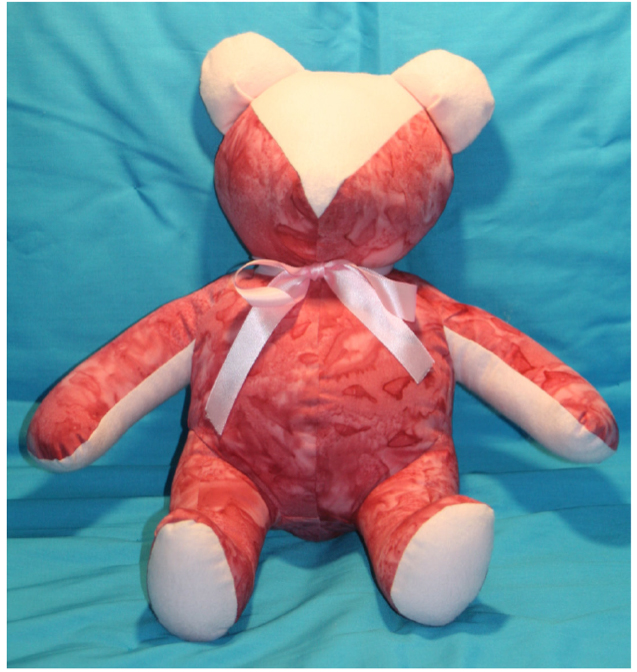
EXAMPLE OF 2-FABRIC BEAR (STUFFED)
CHECKING FOR PINS & NEEDLES
You may have used many pins during your assembly and sewing. Please take your time to thoroughly check you bear and remove all pins.
WHAT HAPPENS NOW?
Please mail or deliver your completed, unstuffed bear to:
American Friends of Jordan River Village Foundation
244 Madison Ave., Suite 482
New York, NY 10016
Please include a note with your name and address, so we can send you a thank you letter! Just throw in a note, and we will find it. There is no need to pin it to a bear – we do not want any pins in there after you took the time to remove all of your sewing pins!
After we receive your bear, we will collect them and get them to Jordan River Village in Israel (either by mail or through personal delivery). Once at the Village, volunteers will stuff and close the bear. Bears will then be distributed to campers.
QUESTIONS?
Please call (888) 999-3054 or email info@afjrv.org
On behalf of our campers, thank you for your time, skills, and energy in making your Bear for Israel! We need many different types of help from many different people to keep camp going. You are now a part of the Jordan River Village family.
For a print friendly version with the patterns click Bears for Israel Instructions